Showing posts with label Sony. Show all posts

Sunday, January 07, 2007

High Definition Mania

The last few months I have been really busy downloading and watching high definition content on my TV. Here's some information on where you can get the high definition content, the software you need to view it and how to use various devices to output high definition video to your LCD/Plasma TV.

What is High Definition?
Technically any video encoded at 720p (720 progressive) and above is considered high definition. The standard high definition resolutions are:
  • 1280 x 720 progressive (720p)

  • 1920 x 1080 interlaced (1080i)

  • 1920 x 1080 progressive (1080p)

The final resolution in the list above, 1920 x 1080 progressive is also called Full HD. You can see a lot of LCD TV's today with this sticker on the front. The Sharp Aquos has the AQUOS LC-46D62U in the 46" range and the Sony Bravia has KLV-40X200A in the 40", the KLV-46X200A and KLV-46X250A in the 46" and the KLV-52X200A in the 56" and the Samsung Mosel range of Full HD TVs - all of which support Full HD and are easily available in the Indian market.

Identifying the HD capability of your TV
Getting back to the point, the first step on the road to high definition is to determine what resolutions your TV supports. If your TV is HD ready, then chances are that it will only support 720p and 1080i. If your TV has a sticker on the front which says Full HD 1080p, then in addition to the two resolutions just mentioned, it will also support the full HD resolution of 1080p. If in doubt, check your TV Manual.

Enabling the appropriate HD resolution
The next step is enabling your TV to display in the HD resolution of your choice (assuming your TV supports that resolution). There are three main aspects here:
1.) The high definition video cables
2.) The high definition video source
3.) The high definition video content

Let us look at each of these in turn.

1.) High Definition Video Cables: First off you need to figure out what is the right kind of cable for your TV. This depends on the output connectors on your TV. Let us look at some of the common connectors in the order of highest resolution to the lowest:

(a) HDMI: This connector looks like this [picture]. HDMI stands for high definition multi-media interface. This is the highest quality digital connector to date providing uncompressed, all-digital audio/video interface. The HDMI 1.3 specification is the latest revision and supports output of Dolby TrueHD and DTS-HD Master Audio streams which can then be decoded by external AV receivers. HDMI can also support all the HD video resolutions mentioned above provided your TV supports it. A good quality HDMI cable will cost anywhere between Rs. 1,500 and 3,000.

(b) PC Input/VGA Connector/HD15 PC Input: This connector looks like this [picture]. The VGA connector is very similar in function to the HDMI connector with one important difference, the VGA connector has support only for digital video not digital audio. The audio part of the signal has to be handled separately. VGA supports all the HD resolutions mentioned above. If you had to choose between HDMI and VGA which one would you choose? That depends. The research I have done so far indicates that VGA can sometimes yield an poor image with washed out colors. I have not seen any such problems reported about the HDMI connector. Your results may vary, so the best bet would be to try this out for yourself and pick the connector that works for you. The PC Input connector is typically used to connect your computer to the TV - and yields amazing results compared to an conventional CRT TV. The picture is crisp, stable and flicker free - just like it is on the LCD panel of your laptop.

(c) Component: This connector looks like this [picture]. The component cable is also capable of transferring an analog video signal between your video source and your TV. The component cable has red, green and blue terminals and is a pure video connector - it does not transfer any audio signal. Component cables can do both progressive and interlaced video - and the maximum resolutions supported depends on the TV.

(d) S-Video: This connector looks like this [picture]. This is a very old technology that is on its way out. I would not recommend investing in S-Video cables or worrying about this connector. This is not a high definition video connector. Leave it alone.

(e) Composite: This connector looks like this [picture]. This was probably the most commonly used analog video connector used up to this point. Chances are your old TV was connected to your video source using the component cable. This connector supports analog audio and video. The cable has three terminals: a red and white terminal for stereo audio and a yellow terminal for the analog video signal. This is not a high definition video connector. This is possibly the worst quality audio and video - once again leave it alone.


High Definition Video Source
The video source is the driver that sends the video signal to your TV and determines the resolution that it will display it at. The video source you have must be capable of high definition resolution support. You can find out the resolutions that it supports in the user manual. I will list out some common video sources that are capable of high resolution video output.

(a) DVD Player: It is fairly common to find bugget DVD players in the market today that have an HDMI output and can display video at resolutions of 720p and 1080i. You can pick these up for between Rs. 8,000 and Rs. 12,000. There are also players that can do full HD at 1080p, but there are fairly expensive. Some examples of DVD players worth considering are the Samsung DVD-HD860 for Rs. 8,000 or the Pioneer DV-490V for around Rs. 12,000.

(b) Gaming Console: The Xbox 360 and the Sony Playstation 3 are gaming consoles that are capable of playing video at all the HD resolutions from 720p, 1080i and 1080p. The original XBox is also capable of doing video at high definition resolutions of upto 720p. It can theoritically also do 1080p, but the processor in the original Xbox is not capable of outputting frames at the rate that is required for smooth viewing. So resolutions above 720p can get very jittery and choppy.

(c) Digital Media Server: You can find a lot of media servers in the market today that are capable of playing high definition video. These are currently not easily available in India - so you will need to scrounge around for these abroad and check with friends.

(d) Home Theatre/Media PC: Today's home theatre and media PC's have the horsepower to output digital audio and video. Depending on the processor and video card and the onboard memory of your video card (and to some extent the RAM of your computer), you will be able to do video outputs at all the high definition resolutions using your home theare/media PC.

(e) Apple TV - The recently released Apple TV is really nothing but a high definition media server - but Apple being Apple - I just have to mention it separately. This neat little device is capable of either streaming digital content over the network or synching the digital content to its onboard 40 GB hard disk for playback. At the moment of writing, Apple TV only support resolutions of 720p. Using Apple TV, you can download video content, sync it wirelessly from you PC or Mac to the Apple TV box and then play it on your wide-screen TV.

(f) Digital Audio Video Receivers: The AV receiver is not a video source per se - but provides HDMI switching which is a very useful capability if you have multiple high definition video sources. The HDMI switching capability allows you to leverage the digital audio and video output capability of multiple HDMI connections and switch between them as needed. What happens here is that the receiver processes the digital audio output from the HDMI connection and amplifies it and drives your home theatre speakers and sends the digital video signal untouched to the HDMI out terminals on the back of the AV receiver - from where you connect it back to your TV. This way, you can take advantage of both the digital video and audio capabilities of your HDMI connection. Some receivers also have multiple HDMI connectors in the back panel and this allows you to connect multiple HDMI sources - this is a real blessing specially if your TV only has a single HDMI connection. If you haven't purchased an HD Ready or Full HD TV yet, I would recommend buying one with multiple HDMI inputs - if you are a audio/videophile like me where the chances of owning multiple high definition sources are quite high.

(g) Blu Ray and HD-DVD Players: You can view HD content using either a HD-DVD player or a Blu Ray player - however at the time of writing, only the PS3 with its built in Blu Ray drive is available in India. There are rumors of XBox shipping its HD-DVD drive, but when it will actually debut is anyones guess. Both these devices are designed to play high definition content in the highest possible resolutions.

(h) HDTV Tuners: HDTV tuners can pull high definition broadcast signals off the air and pipe it into your TV. This option is not yet available in India and it will be a while before channels here broadcast in high definition.

High Definition Video Content
The entire discussion above is moot if you dont have access to high definition video content. This section focuses on the high definition content available in India and how you can get hold of good HD content. The main sources of HD today are:

1.) Torrents: BitTorrent is a peer to peer technology for file sharing and you can get started quickly by installing a BitTorrent client like µTorrent, Azureus, BitTorrent, BitComet or KTorrent. You can find a bunch of really good HD stuff on the torrent sites. Seach for 720p, HD, 1080i and 1080p as search key words to find the right content. You can really find some amazing content on the torrent portals such as TorrentSpy. The BBC Planet Earth in high definition is highly recommended as is the Microcosm. These video clips will render in high definition glory on your TV and is a great way to showcase the high definition capability of your TV.

2.) HD DVD Discs: These are not yet officially available in India - but if you have access to friends abroad and also have a HD DVD player, then this is an excellent source of high definition content.

3.) Blu Ray Discs: Bly Ray is the competing format to HD-DVD - and the main difference between the two is the total maximum storage available on these formats - with Blu Ray leading the race at the moment with upto 50GB disks and HD-DVD coming in at around 30 GB. Once again, Blu Ray is not available in India - but with the release of the PS3, I am sure its just a matter of time before some Blu Ray titles will be available in India.

4.) Video games: You can also get high definition content on your video games - both Xbox 360 and the PS3 are capable of rendering games at high definition resolutions. You can control the actual resolution from the settings/options panel of your gaming console.

Putting it all together
Once you have a clear understanding of the video connectors provided on your TV and the capability of your video source to output digital video and where you can get high definition content - you can now put it all together and enjoy high definition video on your TV. You basically need to connect your video source to your TV using the appropriate high definition connector of your choice. The next step is to either stream high definition content over your network to your video player or burn a DVD disk play it in your video player. You can control the high definition resolution of the final video image from your video player - you will find this in the options or settings menu of your player.

This article is getting pretty long - so I will cut it short here. I will cover how to set up a home network for digital streaming in my next post. Let me know if you have any questions - I will be happy to answer them. Happy viewing!

Resources

Friday, December 01, 2006

XBox 360 Dashboard Update - II

30th November 2006:
A new XBox 360 Dashboard update is now available. You will be prompted to download the update as soon as you log into XBox Live. This update contains fixes for the following:

  • Improved support for HD video output over VGA, including 1080p resolution

  • Improved plug and play performance for wired headsets when being used with wireless controllers

  • Changes made to recently played games list to improve accuracy


This information is courtesy Major Nelson's blog. This is a very important fix for Sony/Samsung high definition TV owners as it fixes the problems related to certain Sony/Samsung TV's not being able to do 1080p on the component/VGA connector which was one of the key features of the original dashboard fall update patch. With this fix, all problems related to 1080p output over component and VGA should now be resolved.

Resources:
Major Nelson's Blog
Engadget - 1080p problem with the fall update
Engadget - 1080p fix update
AVSForum discussion of the 1080p fix

Sunday, November 05, 2006

XBox 360 Dashboard Update - I

The Fall XBox Dashboard Update is now officially available.
OK guys - its out! It was released on October 31st 2006 and is available either as an automatic download from XBox Live Online or can be downloaded by connecting your console to a broadband network. Since we do not have access to XBox Live in India - I was curious to find out if I could update my console with the latest update - and boy was I pleased with my findings.

First of all here is how you can get the update - straight from the official Microsoft Press Release:


This free update for Xbox 360™ will be distributed via Xbox Live® to all members (Xbox Live Silver and Xbox Live Gold) with no disc or hard drive required. If you don't have an Xbox Live account, you can easily sign up free by connecting your console to a broadband Internet connection. Once online, downloading the update is fast and simple, and provides instant access to many new features.


Steps to update your XBox 360


  1. Turn on your XBox and make sure it is connected to a broadband connection.

  2. Go to the XBox Dashboard and to the XBox Live tab

  3. Once there, click on the XBox Live icon.

  4. You will get a screen asking whether you are interested in joining XBox Live.

  5. Click Yes

  6. Your XBox 360 will then attempt to use your network connection to connect to XBox Live.

  7. At this point it will detect the XBox dashboard upgrade and inform you that an upgrade is available and ask you whether you would like to download it.

  8. Click Yes and the download starts - it takes about a couple of minutes (on my 512 kbps broadband connection) and you are done.

  9. Once the download has completed, it will automatically restart your XBox.


How do I check if the download worked?

  1. To confirm that the download was successful, go to the System tab of the XBox Dashboard.

  2. Click on Console Settings and select Display

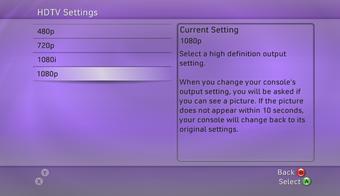
  3. Click on Display to see two options HDTV Settings and Screen Format.

  4. Select HDTV Settings and you will see 1080p as one of the output formats that you can choose.

  5. If you see 1080p on this screen, then you have updated your XBox 360 successfully.


What are the cool features included in this download?

It won't make sense for me to list all the features and duplicate information from the Microsoft website. Instead I will focus on the features that I think will most affect folks here in India:


  1. HD 1080p video mode support over VGA and component cables.

  2. Xbox 360™ HD DVD Player support.

  3. Stream WMV video from a Windows PC running Windows Media Player 11, Zune software, or Windows Media Connect.

  4. Play video from storage devices such as USB flash drives, Xbox 360 Memory Units, etc.

  5. Play video from CD or DVD data discs.

  6. Stream music, pictures and video from a Zune device.

  7. Improved visual quality of video playback.


Conclusion:


Microsoft has very strategically updated its console with 1080p support well ahead of the much anticipated PlayStation 3 release on November 17th. The timing for the 1080p and HD-DVD player support couldn't have come at a better time. Microsoft seems to have got an upper hand with a year's lead time over Sony as well as an established XBox Live online community. With the addition of 1080p support and HD-DVD support, Microsoft has checked off a couple of very important features on its checklist - and I am sure every gamer that owns an XBox 360 would be very pleased with this update capability of the console.


Resources:
Official press release from Microsoft
Details of the November 2006 XBox Dashboard upgrade
Complete list of features in the XBox Dashboard update

Monday, October 30, 2006

My Home Theatre System - Part II

The second part of this series describes the speaker configuration in my home theater system. As described in the first part, the speakers are driven by the eminently capable Yamaha R-V1103 multi-channel receiver. The speakers play a key role in the home theater system as they are ultimately responsible for sound delivery where the 'rubber hits the road' so to speak.


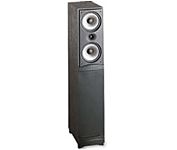
Front Speakers: My main front speakers are the Infinity Compositions Overture OVTR1 series of speakers. The Overtures are a 3 way full range set of speakers with an active side firing woofer - which means that these speakers need to be externally powered to drive the bass. Covering a frequency range of 35~20,000 Hz with a sensitivity of 92 dB at 1m/2.83 V with an 8 ohms impedance, the speakers do a great job of filling the room with clear crisp sound.


The 3 drivers that make up the speaker are:
Low Frequency: One 8" (200 mm) high efficiency, ultra-linear long throw magnetically shielded woofer.

Mid Frequency: Two 4" (100 mm) high efficiency, magnetically shielded mid-range drivers

High Frequency: One 1" (25mm) soft dome high efficiency, neodymium magnet, magnetically shielded tweeter

Specifications:
Amplifier Requirements: 10-100W @ 8 ohms
Crossover Frequencies: 300 and 3000 Hz
Peak Output: 250VA
Power Consumption: 150W (max), 7W (standby)
Width x Height x Depth: 5 3/4" x 12 1/2" x 12 1/2"
Weight: 13 kg

The Overtures are mounted on speaker stands that also come from Infinity and look pretty cool.

Center Channel: My center channel is the Infinity CC3 which is a low profile speaker system with two low and mid range drivers and a tweeter for high frequencies. This speaker has a frequency range of 80 ~ 20,000 Hz with the same sensitivity as the Overtures (91 dB @ 2.83 V and 1 m).


The drivers in this speaker are:

Low/Mid Frequency: 2 x 51 ⁄4" (125 mm) high-efficiency, ultra linear, long-throw, magnetically-shielded drive units

High Frequency: 1" (25 mm) soft dome, high-efficiency,neodymium magnet, magnetically shielded tweeter

Crossover Frequency: 2,500 Hz

The maximum peak output is 111 dB with an impedance of 8 ohms. The accompanying speaker stand allows a vertical tilt range of 25 degrees for ideal sound coverage whether placed on top of or below the television.

Rear Surrounds: My rear surrounds are the Infinity RS 5 floor standing speakers. These speakers feature Polypropylene Cones and Silk Dome Tweeters with co-injected woofer cones that are ideally suited for digital home theater sound. The Infinity RS-5 is a floor standing speaker with dual 6.5" drivers in D'applito configuration and a 1" soft dome tweeter.


Specifications:
Recommended Amplifier Power: 15-200W
Frequency Range: 35 ~ 20,000 Hz
Sensitivity (2.83V @ 1m): 92 dB spl
Nominal Impendence: 8 ohms
Bass: Dual 6 1/2" (160 mm)
High Frequency: 1" (25 mm) tweeter
Height, Width, Depth: 40 x 7 1/2 x 12 1/2"
Weight: 18 kgs

Active Sub Woofer: My home theater speaker system round up is completed by the Sony SA-WM40 - which is an active powered sub woofer with a 12" long throw driver in a bass-reflex (vented) cabinet. An onboard amplifier delivers 120 watts of power to the driver. The SA-WM40 sports both line-level and speaker-level inputs, as well as a line output for connection to additional subwoofers for even more bass. The crossover is variable from 50 Hz-170 Hz. This will help you to match this sub to the bass characteristics of your main speakers. The phase switch allows you to correct any phase conflict that may occur between the sub and your satellite speakers.


Specifications:
Type: Active Sub-Woofer (magnetically shielded design)
Speaker Unit: Woofer 30 cm diameter (12") cone type
Continuous RMS output: 120W
Reproduction Frequency Range: 20Hz to 170 Hz
High Feequency-Cut Off Frequency: 50Hz to 170 Hz
Phase Selector: Normal, Reverse
Input Jacks: Line Out (input jack pin)
Speaker Out: (output terminals)
Power Requirements: 120V AC, 60 Hz

Sunday, October 29, 2006

My Home Theatre System - Part I

I thought it would be be a good idea to share my existing home theatre system setup with the readers of this blog. I have had my system for about 8 years now and am thinking of an upgrade. This is the perfect time to talk about it and document everything before I replace the components and upgrade. In this first part, I will cover all the components of my home theatre system except my speakers which I will conver in Part II.

Home Theater System Components

TV: The Sony Trinitron 32" KV-32V40 is the center piece of my home theater system. I purchased this system for around $800 in the US around 10 years back. Trust me when I say that it was a lot of money at that time for a TV. This is a CRT TV with a 32" diagonal screen with speakers in a thin strip on either side. It has an extra set of composite inputs on the front for hooking up a gaming console or other video sources. The back of the TV has the main set of connectors: 1 x S-Video, 2 x Composite/Audio In and 1 x Audio Out.

Since I purchased this TV in the US, it has an NTSC tuner which is useless in India - so I cannot view cable TV directly on this TV - I have to first run it through my computer via a TV tuner card and then into my TV via the S-Video or Composite inputs. I tried purchasing an external tuner in Pune, but they just weren't upto the mark in terms of performance or picture quality.

Update: I finally found another way to make my NTSC TV work in India.

The other thing to note is that this is a 110V TV - which means I also need a step down transformer with adequate power ratings to convert 230V AC to 110V AC. The maximum power consumption of this unit is 180W - but given the other equipment that I have - I thought it safe to get a beefy 1000 W step down transformer to power all my 110V equipment.

The things I like about the TV are the reliability, good picture and color reproduction and simple styling. The things I think could have been done better are: more connectors - that's right - the TV has just one S-Video connector - considered state of the art at the time I purchased the TV. So it is a real pain for me to keep switching the S-Video between my XBox and my DVD Player - but I have learnt to live with this and now I am very adept at switching the S-Video cables using just my fingers to feel the outline of the connector slot at the back of the TV. But this is not an issue if you plan to use the composite connectors as there are plenty available on the front/rear of the TV. The TV also weighs in at 70 kgs - which means its a real heavy piece of equipment - but also very sturdy because it made is across the oceans in a container when I moved from the US to India and also survived the local transportation when I moved houses in Pune.

DVD Player: I purchased my Sony DVP-S500D DVD Player for about $500 about 8 years ago in the US. This was one of the first DVD players to hit the market - and naturally as an early adopter I was the first to purchase it regardless of the then steep price.


This player plans standard DVD's, music CD's and VCD's - but no MP3 because the technology wasn't prevalent at that time. The player also features 5.1 Dolby Digital output - which was a cutting edge technology at the time I purchased the player. In fact a sticker on the front of the DVD player screams - Dolby Digital 5.1 ch output. The players these days won't even mention this because this is now standard and taken for granted.

In terms of connectors, the player has a very good set of outputs including optical digital output and coaxial output for the 5.1 channel Dolby Digital audio output along with separate channel outputs for each of the 5.1 channels. The back panel also has composite, S-Video and component outputs for the video signal. The front panel includes a head phone jack for listening to music CD's with a line level adjuster.

This player is a region 1 player meaning that it will only play region 1 discs (US/NTSC) and of course All Region discs. I looked high and low for a firmware upgrade to override the region code setting but was unable to find it - so one main drawback of this player is that it will only play my US DVD's and Indian DVD's that are region free or universal.Since this was purchased in the US, this is also a 110V device - however the power consumption is very less compared to the TV - clocking in at a miniscule 22 Watts of power. This DVD player does not need a beefy step down transformer and will work just fine on a simple 50 Watt step down transformer that you can purchase at the local electrical store.

You can also select between 4:3 Letter Box, 4:3 Pan Scan and 16:9 aspect output for the video signal depending on whether you are connecting the player to a normal 4:3 aspect TV or a high definition 16:9 aspect plasma or LCD TV. Overall I love this player - I have had it for a while now and it has done a great job rendering high quality pictures on my TV. The dual discrete optical pickup with 96kHz 24 bit D/A converter does a phenomenal job in decoding the digital video and audio information encoded on the DVD and streams it in glorious color and detail into my TV and send a very high quality digital audio signal to my AV receiver to decode and amplify and drive my speakers.

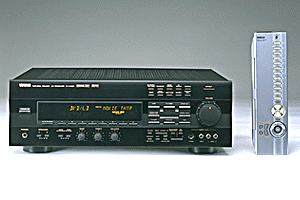
Multi-channel audio receiver: The powerhorse of my home theater system is the Yamaha R-V1103 Natural Sound AV Receiver which I purchased for around $800 about 8 years back in the US. This receiver pumps out a beefy 100W per channel for each of the 5 channels in the 5.1 channel system. The receiver incorporates a Dolby Pro Logic Surround decoder along with a Dolby Digital (AC-3) decoder for multi channel sound reproduction. Yamaha is also known for its DSP (Digital Sound Processing) and the receiver comes with 10 DSP modes with settings for Rock Concert, Jazz Stadium, Church, Disco, Stadium, TV Sports, Movie Theater and Hall. To be honest, I am not a big fan of the DSP modes and I can hardly distinguish between these different modes and don't really use them that much.


The key specification for which I purchased this receiver is of course the Dolby Digital AC-3 decoder which provides completely independent multi-channel audio - with five full range channels in what is referred to as 3/2 configuration - 3 front channels (left, center, right) and 2 rear channels (left and right). A sixth bass only channel is also provided for output of LFE (Low Frequency Effect) - this channel is counted as 0.1 - giving a total of 5.1 channels. This allows precise sound orientation and gives rise to clarity in the sound signal that is unprecedented - you can hear effects like bullet casings hitting the floor behind you in a gun battle scene, or the screaming wail of a Formula 1 car as it blazes around the track. This is a truly immersive sound field and has to be experienced to be believed. Believe me, once you have experienced Dolby Digital sound in your home, you will never want to go back to the older Dolby Pro Logic sound.

The Yahama receiver comes with a plethora of connectors to satisfy every device that can be connected to it. It has an RCA type input each for Phono, CD, Tape, DVD/LD, TV/DBS, VCR (in/out). In the digital audio section, it has 1 x optical digital output and 2 x coaxial digital outputs. It also features separate RCA outputs for each of the 5.1 channels. In addition, it also has a video output section with 3 x S-Video connectors - of which one is a monitor out and the other two being S-Video in and out respectively. There are also 5 x composite video connectors with 1 monitor out, 2 reserved for DVD/LD and TV/DBS and 1 pair of VCR in/out composite connectors. The front panel of the receiver also has an S-Video input and 1 x composite audio and video inputs for easy connection of a gaming console or camcorder. Again as usual I find the connectors inadequate and would have loved to have an additional optical digital output and a digital coaxial output along with an additional S-Video input - I don't mean to sound greedy - but I really need these additional connectors to avoid constantly fiddling with the back panel of the receiver.

There are also speaker terminals on the back panel to connect the 5.1 channel speakers - left front, center, right front, left rear surround and right rear surround. The receiver also supports two sets of speakers for the front left, center and right - referred to as A/B speakers - you can connect upto 2 front left speakers, 2 front right speakers and 2 center speakers if you so wish. There is a switch on the front panel of the receiver that allows you to select between the A, B or both AB speakers.The receiver also features main channel line level outputs for driving speakers with an external amplifier - so if you want the Yahama receiver to decode the signal using the onboard Dolby Digital decoder but want the amplification to be done by a dedicated amplifier, then the main channel line level outputs can be used to feed the line levels directly to the amplifier which will in turn drive the speakers. In this case you will be primarily using the AV Receiver as a Dolby Digital Decoder and using another external amplifier to amplify the sound source and drive the speakers.

This configuration makes sense if you have a really good dedicated amplifier and want to squeeze that extra level of detail from the sound - for most home theaters this is an overkill. the only decive you would connect to the line level output of the receiver would be the sub-woofer, as this device has an inbuilt amplifier to amplify the line level input signal.The receiver also has a built in AM/FM tuner with an AM antenna loop that comes in the box which can be hooked up to the rear panel to receive AM/FM broadcasts. You can also connect an indoor FM antenna or an external outdoor FM antenna for better FM reception.

The silver remote that comes with this unit is a masterpiece in itself. It is a learning remote meaning that you can program it to control all your home theater devices like DVD Player, CD Changer and Tape Deck. It has a macro facility that allows you to do many operations with a single button press - for example - turn ON the TV, Receiver, DVD Player and press PLAY on the DVD player OR power down the TV, Receiver and DVD Player all with a single button click. The remote is backlit and has raised bumps along the buttons to easy control in the dark. The remote has a face-plate that can be opened up to reveal a whole bunch of other buttons that can perform virtually any operation you can think of.

CD Changer: My home theater also features a 110 CD changer from Yahama (no surprises there). The Yamaha CDM-900 110 Disc CD Changer holds all the CD's that I listen to and offers a convenient way to organize and group my CD's based on music type and style. It allows me to label each CD by artist and title and has the ability to display this information when the CD is playing. The really cool thing is that once you enter this information, the system remembers it and even if you change the CD position in the player, it is able to associate the CD with the artist/title information that you previously entered. It is this kind of intelligence that I really love - and I think small touches like this go a long way in making a good system an excellent system.


The CD changer has a front loading system with a front panel that swings down to reveal 110 CD's stacked vertically with the slot numbers labeled on the bottom face of the inside of the front panel. There is also a disc carriage loader that allows easy loading and unloading of CD's from their slots - but this is not really needed in day-day use. The remote that comes with the player has all kinds of buttons to do virtually anything you need sitting on your couch. The 110 CD's are organized as 5 groups - A,B,C,D and E. So for instance discs 1-20 are in Group A, discs 21-40 in Group B and so on. This allows you to categorize discs according to artist or music type and you can enjoy various play modes in each group. For instance you can select Group A and set it to random play or repeat plan - in which case discs 1-20 will be played in the selected play mode. This feature is quite useful if you have genres of music (rock, pop, jazz, new age, lounge) that you want to listen to as a group.

The CD changer also features a +1 disc - this is the first disk slot and is used if you want to listen to a CD and then remove it from the player. The +1 disc slot is usually kept empty for this purpose and allows you to quickly slip in a disc and listen to it without having to remember which empty slot you placed the disc in.Care has to be taken while moving the CD changer and if you need to transport it from one location to another, always remove the CD's from the changer before moving it. Otherwise, the CD's can fall into the player and you will have to unscrew the cover and get inside the player to remove the discs and restore order. I have done this a few times - the good part about the internal layout of the CD changer is that it is very well organized and uncluttered allowing you to work efficiently. I don't think I need to say that you need to make sure you unplug the device before attempting to open it - that's common sense isn't it?

Finally this is also a 110V/60 Hz system which I need to run on my step down transformer, however the power consumption is a measly 15Watt making this a good candidate for a smaller independent step down converter that you can purchase locally. Also this player can be chained to another CDM-900 CD Changer to have continuous play of 220 CD's if you so desire. The back panel of the CD changer has one optical output and 1 standard RCA phono jack for left right stereo sound output to an AV receiver. In my case, I have connected my CD changer to my AV receiver using the RCA phono jacks.As with all Yahama products, styling is very clean and uncluttered. The LCD panel on the front on the CD changer (and as with the AV receiver) is a cool orange - which looks really nice at night with all the lights switched off and has a charm of its own. The front of the panel also has a jog dial which you can rotate to change discs easily and is also used for entering artist/title text into the player. Overall I love my CD changer and have been very happy with it ever since I have owned it and highly recommend it if you are looking for one.

Twin Tape Deck: The twin tape deck also happens to be a Yamaha product - the K-903 Natural Sound Stereo Cassette Deck with auto reverse 4 track, 2 channel recording and playback. The tape deck comes with two decks - A and B with continuous relay play feature that allows you to play both sides of cassette A and B continuously in many different modes. It also has a Dolby Noise Reduction feature to eliminate hiss and noise during playback. The LCD screen on the front panel features a peak level meter in orange that looks quite cool and displays the peaks of the signal levels during playback or recording over a -30dB to +6 dB range. There are separate meters for each left and right channel.


The tape deck also has high speed dubbing function from Deck A to Deck B which allows you to quickly make copies of your casette tapes. The frequency response of the tape deck is between ~20-16000 Hz +/- 3 dB for Type I Normal tapes and this can go all the way to 20-19000 Hz +/- 3 dB for Type IV Metal tapes.

I hardly use the tape deck - and it is primarily used by my Dad to listen to and record his tapes. However as with the other Yamaha products, the build quality and finish is excellent and it has performed without any problems for over 6 years now - so I have no complaints and am very happy with this component.

Conclusion
This covers a round up of my home theatre system except for my speakers which I will cover in a second post. Hope you enjoyed reading this!