Showing posts with label US to India. Show all posts

Sunday, November 05, 2006

How to hook up your US NTSC TV to work in India

I returned back to India in 2002 after about 6 years in the US. I had purchased a bunch of electronic stuff while in the US and decided to bring it all back to India with me - and so my AV Receiver, DVD Player, 32" Sony CRT TV, XBox and Infinity Speakers and Sub Woofer sailed the seven seas in a container and thankfully made it to India in one piece. But when I got here I realized that it would take some work to get my NTSC TV to work in India and I went about figuring it out. Here is what I found out:

Key Differences between US and India TV Systems: The key things to note while using a US TV in India are:


  • The US TV broadcasts are in a format called NTSC while India uses PAL (also used in Europe and UK - no surprises where that came from).

  • The other main difference of course is the voltage systems in US and India. US has the 110-120V @ 60 Hz while India uses 230V @ 50 Hz


So the main challenges while using a US TV in India are solving the voltage conversion problem and the PAL-NTSC conversion problem. Fortunately after a lot of experimenting and tweaking I was able to find the right equipment to help me solve both problems.


Voltage Conversion:

Voltage conversion is handled by a device called a voltage converter. You can get step down converters that convert 230V-110V (which is what I need) and also 110V-230V (in case you take Indian electrical stuff to the US). If you go to the local electrical store, you can find small electrical adapters with low power ratings - if you take one of these and plug your TV into it - most likely it will blow up and take your TV along with it.

The problem here is that you need to find a power converter with the right power rating to hook up the TV because CRT TV's have certain minimum power requirements - specially when you turn them on and there is an initial surge which your voltage converter needs to be able to handle. You should look for the power rating in Watts of your TV - it should either be on the back panel of the TV or in the manual. Once you get the power rating you should get a voltage converter that has at least 25-50% more capacity than the rating. For instance, if your TV requires 200 Watts of power, consider buying a 300 Watt converter.

Connect one end of the step down voltage converter with the appropriate power rating to your mains power supply. Connect a power strip to the output of the step down voltage converter - making sure to connect the 110V output socket (some voltage converters have a switch that allows you to set the output voltage). Make sure your power strip is a simple pass through strip - otherwise if the power strip has internal circuits and is purchased in India, then connecting it to the 110 V output is liable to blow it up - be careful about this. Finally connect your TV to this power strip which is connected to the 110V output of the voltage converter.

You don't need to be concerned about the frequency difference in the US and India (60 Hz AC in US vs. 50 Hz AC in India) as most electronic equipment such as TV's dont really care about AC and convert it to DC inside anyways. The AC frequency difference will make a difference when you have heavy duty equipment such as a dishwasher or microwave oven - so don't bother running those kind of equipment on a voltage converter in India as there are more sensitive to the frequency difference.


PAL - NTSC Conversion:

Voltage conversion is a simpler problem to solve that the PAL-NTSC conversion. There are a couple of options here each with its own pro's and con's.


1.)Using a standalone PAL-NTSC converter/tuner: My initial impulse was to try and find a good PAL-NTSC converter/tuner - but try as I might I wasn't able to find a reliable one in India. I did a lot of research on this and did not find any that actually worked. I researched this on the Internet and found that really good ones were quite expensive ($700-$1000). So I gave up this line of thought after a few attempts all of which were unsuccessful.

2.)Using your Windows XP computer with a TV Tuner Card: The next option I tried was to hook up my Windows XP PC with a Pinnacle TV Tuner Card. I also had a beefy NVidia GeForce graphics adapter card that had an S-Video output. So I connected my TV Tuner to the RF cable and connected my computer to my TV using the S-Video connector on my graphics card. You can also use the composite video connector on your TV tuner card if it has one, but the signal quality will be lower that S-Video. This solution worked and I was able to tune into the cable channels using the TV Tuner card and was able to see reasonably good picture on my TV.

However this approach has some drawbacks. The main problem is that the computer needs to be started for each TV viewing session which is a real pain if you want to quickly catch something on TV. Also the graphics card was not quite able to fill the entire screen with the image - so I had some black bars on the top and bottom of the image. Also since this ran on the PC, there were many times when the PC would freeze and I had to restart - so it was quite frustrating and not the ideal solution.

3.)Using an external PAL Tuner with a PAL-NTSC Converter: Finally after a bit of research, I found a good solution. The first part of the solution was an external PAL tuner. This is a small box that connects to the cable RF input and comes with a small remote to change channels and control volume. It has a composite video and audio output.

The external PAL tuner can be easily purchased in India - I got mine from the electronics bazaar in Budhwar Peth in Pune for about Rs. 1500. I initially tried directly connecting the composite output of the PAL tuner to my TV - but that did not work. I found out that the video signal output by the PAL tuner was still a PAL signal. I had to find a way to convert this signal to NTSC.

That is where the second part of the solution come into play. After a lot of research I found a PAL-NTSC converter - The Com-World Professional Video Converter CMD 1200 - that actually worked. I had my brother in the US purchase one for me and ship it over. I connected the output of my PAL tuner to the input of the CMD 1200 PAL-NTSC converter and connected the output video of the CMD 1200 PAL-NTSC converter to my TV - and viola - wonderful picture with very good clarity and no black bars anywhere.

This turned out to be the perfect solution because I didn't have to keep booting up my PC, it turned on and off very quick and was simple to operate. Also the handy remote worked great to do the basic functions of changing channel and controlling volume. This is my current setup and I am very happy with it. The only downside to this that I can think of is that the converter costs around $300 - so my wife was up in arms about this purchase and argued that you could buy a new TV for that price. She was right of course, but it was about figuring out how to fix things and the cost really did not matter for me (hope my wife is not reading this :))

Update: A lot of people have questions about watching DTH (Direct To Home) content from providers such as Tata Sky, Dish TV or Reliance Blue Magic on their NTSC TV. Here is some information on how to do that.


Conclusion:

So that folks is the deal with hooking up a US NTSC TV to view cable channels in India. Do let me know if you have any questions or comments - I'd be happy to help out.


Resources:
Technical Specifications for CMD 1200
Voltage Converters
Wikipedia entry for NTSC
Wikipedia entry for PAL

Sunday, October 29, 2006

My Home Theatre System - Part I

I thought it would be be a good idea to share my existing home theatre system setup with the readers of this blog. I have had my system for about 8 years now and am thinking of an upgrade. This is the perfect time to talk about it and document everything before I replace the components and upgrade. In this first part, I will cover all the components of my home theatre system except my speakers which I will conver in Part II.

Home Theater System Components

TV: The Sony Trinitron 32" KV-32V40 is the center piece of my home theater system. I purchased this system for around $800 in the US around 10 years back. Trust me when I say that it was a lot of money at that time for a TV. This is a CRT TV with a 32" diagonal screen with speakers in a thin strip on either side. It has an extra set of composite inputs on the front for hooking up a gaming console or other video sources. The back of the TV has the main set of connectors: 1 x S-Video, 2 x Composite/Audio In and 1 x Audio Out.

Since I purchased this TV in the US, it has an NTSC tuner which is useless in India - so I cannot view cable TV directly on this TV - I have to first run it through my computer via a TV tuner card and then into my TV via the S-Video or Composite inputs. I tried purchasing an external tuner in Pune, but they just weren't upto the mark in terms of performance or picture quality.

Update: I finally found another way to make my NTSC TV work in India.

The other thing to note is that this is a 110V TV - which means I also need a step down transformer with adequate power ratings to convert 230V AC to 110V AC. The maximum power consumption of this unit is 180W - but given the other equipment that I have - I thought it safe to get a beefy 1000 W step down transformer to power all my 110V equipment.

The things I like about the TV are the reliability, good picture and color reproduction and simple styling. The things I think could have been done better are: more connectors - that's right - the TV has just one S-Video connector - considered state of the art at the time I purchased the TV. So it is a real pain for me to keep switching the S-Video between my XBox and my DVD Player - but I have learnt to live with this and now I am very adept at switching the S-Video cables using just my fingers to feel the outline of the connector slot at the back of the TV. But this is not an issue if you plan to use the composite connectors as there are plenty available on the front/rear of the TV. The TV also weighs in at 70 kgs - which means its a real heavy piece of equipment - but also very sturdy because it made is across the oceans in a container when I moved from the US to India and also survived the local transportation when I moved houses in Pune.

DVD Player: I purchased my Sony DVP-S500D DVD Player for about $500 about 8 years ago in the US. This was one of the first DVD players to hit the market - and naturally as an early adopter I was the first to purchase it regardless of the then steep price.


This player plans standard DVD's, music CD's and VCD's - but no MP3 because the technology wasn't prevalent at that time. The player also features 5.1 Dolby Digital output - which was a cutting edge technology at the time I purchased the player. In fact a sticker on the front of the DVD player screams - Dolby Digital 5.1 ch output. The players these days won't even mention this because this is now standard and taken for granted.

In terms of connectors, the player has a very good set of outputs including optical digital output and coaxial output for the 5.1 channel Dolby Digital audio output along with separate channel outputs for each of the 5.1 channels. The back panel also has composite, S-Video and component outputs for the video signal. The front panel includes a head phone jack for listening to music CD's with a line level adjuster.

This player is a region 1 player meaning that it will only play region 1 discs (US/NTSC) and of course All Region discs. I looked high and low for a firmware upgrade to override the region code setting but was unable to find it - so one main drawback of this player is that it will only play my US DVD's and Indian DVD's that are region free or universal.Since this was purchased in the US, this is also a 110V device - however the power consumption is very less compared to the TV - clocking in at a miniscule 22 Watts of power. This DVD player does not need a beefy step down transformer and will work just fine on a simple 50 Watt step down transformer that you can purchase at the local electrical store.

You can also select between 4:3 Letter Box, 4:3 Pan Scan and 16:9 aspect output for the video signal depending on whether you are connecting the player to a normal 4:3 aspect TV or a high definition 16:9 aspect plasma or LCD TV. Overall I love this player - I have had it for a while now and it has done a great job rendering high quality pictures on my TV. The dual discrete optical pickup with 96kHz 24 bit D/A converter does a phenomenal job in decoding the digital video and audio information encoded on the DVD and streams it in glorious color and detail into my TV and send a very high quality digital audio signal to my AV receiver to decode and amplify and drive my speakers.

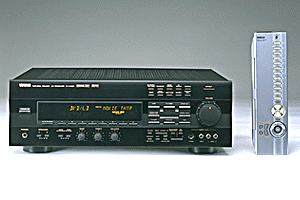
Multi-channel audio receiver: The powerhorse of my home theater system is the Yamaha R-V1103 Natural Sound AV Receiver which I purchased for around $800 about 8 years back in the US. This receiver pumps out a beefy 100W per channel for each of the 5 channels in the 5.1 channel system. The receiver incorporates a Dolby Pro Logic Surround decoder along with a Dolby Digital (AC-3) decoder for multi channel sound reproduction. Yamaha is also known for its DSP (Digital Sound Processing) and the receiver comes with 10 DSP modes with settings for Rock Concert, Jazz Stadium, Church, Disco, Stadium, TV Sports, Movie Theater and Hall. To be honest, I am not a big fan of the DSP modes and I can hardly distinguish between these different modes and don't really use them that much.


The key specification for which I purchased this receiver is of course the Dolby Digital AC-3 decoder which provides completely independent multi-channel audio - with five full range channels in what is referred to as 3/2 configuration - 3 front channels (left, center, right) and 2 rear channels (left and right). A sixth bass only channel is also provided for output of LFE (Low Frequency Effect) - this channel is counted as 0.1 - giving a total of 5.1 channels. This allows precise sound orientation and gives rise to clarity in the sound signal that is unprecedented - you can hear effects like bullet casings hitting the floor behind you in a gun battle scene, or the screaming wail of a Formula 1 car as it blazes around the track. This is a truly immersive sound field and has to be experienced to be believed. Believe me, once you have experienced Dolby Digital sound in your home, you will never want to go back to the older Dolby Pro Logic sound.

The Yahama receiver comes with a plethora of connectors to satisfy every device that can be connected to it. It has an RCA type input each for Phono, CD, Tape, DVD/LD, TV/DBS, VCR (in/out). In the digital audio section, it has 1 x optical digital output and 2 x coaxial digital outputs. It also features separate RCA outputs for each of the 5.1 channels. In addition, it also has a video output section with 3 x S-Video connectors - of which one is a monitor out and the other two being S-Video in and out respectively. There are also 5 x composite video connectors with 1 monitor out, 2 reserved for DVD/LD and TV/DBS and 1 pair of VCR in/out composite connectors. The front panel of the receiver also has an S-Video input and 1 x composite audio and video inputs for easy connection of a gaming console or camcorder. Again as usual I find the connectors inadequate and would have loved to have an additional optical digital output and a digital coaxial output along with an additional S-Video input - I don't mean to sound greedy - but I really need these additional connectors to avoid constantly fiddling with the back panel of the receiver.

There are also speaker terminals on the back panel to connect the 5.1 channel speakers - left front, center, right front, left rear surround and right rear surround. The receiver also supports two sets of speakers for the front left, center and right - referred to as A/B speakers - you can connect upto 2 front left speakers, 2 front right speakers and 2 center speakers if you so wish. There is a switch on the front panel of the receiver that allows you to select between the A, B or both AB speakers.The receiver also features main channel line level outputs for driving speakers with an external amplifier - so if you want the Yahama receiver to decode the signal using the onboard Dolby Digital decoder but want the amplification to be done by a dedicated amplifier, then the main channel line level outputs can be used to feed the line levels directly to the amplifier which will in turn drive the speakers. In this case you will be primarily using the AV Receiver as a Dolby Digital Decoder and using another external amplifier to amplify the sound source and drive the speakers.

This configuration makes sense if you have a really good dedicated amplifier and want to squeeze that extra level of detail from the sound - for most home theaters this is an overkill. the only decive you would connect to the line level output of the receiver would be the sub-woofer, as this device has an inbuilt amplifier to amplify the line level input signal.The receiver also has a built in AM/FM tuner with an AM antenna loop that comes in the box which can be hooked up to the rear panel to receive AM/FM broadcasts. You can also connect an indoor FM antenna or an external outdoor FM antenna for better FM reception.

The silver remote that comes with this unit is a masterpiece in itself. It is a learning remote meaning that you can program it to control all your home theater devices like DVD Player, CD Changer and Tape Deck. It has a macro facility that allows you to do many operations with a single button press - for example - turn ON the TV, Receiver, DVD Player and press PLAY on the DVD player OR power down the TV, Receiver and DVD Player all with a single button click. The remote is backlit and has raised bumps along the buttons to easy control in the dark. The remote has a face-plate that can be opened up to reveal a whole bunch of other buttons that can perform virtually any operation you can think of.

CD Changer: My home theater also features a 110 CD changer from Yahama (no surprises there). The Yamaha CDM-900 110 Disc CD Changer holds all the CD's that I listen to and offers a convenient way to organize and group my CD's based on music type and style. It allows me to label each CD by artist and title and has the ability to display this information when the CD is playing. The really cool thing is that once you enter this information, the system remembers it and even if you change the CD position in the player, it is able to associate the CD with the artist/title information that you previously entered. It is this kind of intelligence that I really love - and I think small touches like this go a long way in making a good system an excellent system.


The CD changer has a front loading system with a front panel that swings down to reveal 110 CD's stacked vertically with the slot numbers labeled on the bottom face of the inside of the front panel. There is also a disc carriage loader that allows easy loading and unloading of CD's from their slots - but this is not really needed in day-day use. The remote that comes with the player has all kinds of buttons to do virtually anything you need sitting on your couch. The 110 CD's are organized as 5 groups - A,B,C,D and E. So for instance discs 1-20 are in Group A, discs 21-40 in Group B and so on. This allows you to categorize discs according to artist or music type and you can enjoy various play modes in each group. For instance you can select Group A and set it to random play or repeat plan - in which case discs 1-20 will be played in the selected play mode. This feature is quite useful if you have genres of music (rock, pop, jazz, new age, lounge) that you want to listen to as a group.

The CD changer also features a +1 disc - this is the first disk slot and is used if you want to listen to a CD and then remove it from the player. The +1 disc slot is usually kept empty for this purpose and allows you to quickly slip in a disc and listen to it without having to remember which empty slot you placed the disc in.Care has to be taken while moving the CD changer and if you need to transport it from one location to another, always remove the CD's from the changer before moving it. Otherwise, the CD's can fall into the player and you will have to unscrew the cover and get inside the player to remove the discs and restore order. I have done this a few times - the good part about the internal layout of the CD changer is that it is very well organized and uncluttered allowing you to work efficiently. I don't think I need to say that you need to make sure you unplug the device before attempting to open it - that's common sense isn't it?

Finally this is also a 110V/60 Hz system which I need to run on my step down transformer, however the power consumption is a measly 15Watt making this a good candidate for a smaller independent step down converter that you can purchase locally. Also this player can be chained to another CDM-900 CD Changer to have continuous play of 220 CD's if you so desire. The back panel of the CD changer has one optical output and 1 standard RCA phono jack for left right stereo sound output to an AV receiver. In my case, I have connected my CD changer to my AV receiver using the RCA phono jacks.As with all Yahama products, styling is very clean and uncluttered. The LCD panel on the front on the CD changer (and as with the AV receiver) is a cool orange - which looks really nice at night with all the lights switched off and has a charm of its own. The front of the panel also has a jog dial which you can rotate to change discs easily and is also used for entering artist/title text into the player. Overall I love my CD changer and have been very happy with it ever since I have owned it and highly recommend it if you are looking for one.

Twin Tape Deck: The twin tape deck also happens to be a Yamaha product - the K-903 Natural Sound Stereo Cassette Deck with auto reverse 4 track, 2 channel recording and playback. The tape deck comes with two decks - A and B with continuous relay play feature that allows you to play both sides of cassette A and B continuously in many different modes. It also has a Dolby Noise Reduction feature to eliminate hiss and noise during playback. The LCD screen on the front panel features a peak level meter in orange that looks quite cool and displays the peaks of the signal levels during playback or recording over a -30dB to +6 dB range. There are separate meters for each left and right channel.


The tape deck also has high speed dubbing function from Deck A to Deck B which allows you to quickly make copies of your casette tapes. The frequency response of the tape deck is between ~20-16000 Hz +/- 3 dB for Type I Normal tapes and this can go all the way to 20-19000 Hz +/- 3 dB for Type IV Metal tapes.

I hardly use the tape deck - and it is primarily used by my Dad to listen to and record his tapes. However as with the other Yamaha products, the build quality and finish is excellent and it has performed without any problems for over 6 years now - so I have no complaints and am very happy with this component.

Conclusion
This covers a round up of my home theatre system except for my speakers which I will cover in a second post. Hope you enjoyed reading this!