Seems like there are a lot of folks with NTSC TV's in India who want to watch Direct To Home (DTH) on their NTSC TV using the settop box provided by vendors like Dish TV or Tata Sky and don't know how to achieve this. This article is about my research of this problem and the solution I found for it. Hope this is helpful to you also.
The Problem: The basic problem is that the broadcast format in India is PAL - so you need a way to convert the PAL broadcast to NTSC before you can watch it on your NTSC TV.
The Solution: The solution requires a PAL-NTSC converter for this to work. A PAL-NTSC converter works like this - it takes a PAL signal (typically coming out of your DTH provider's set top box) and converts it to NTSC format viewable on a NTSC TV.
After a lot of research I found a decent PAL-NTSC converter within my budget - The Com-World Professional Video Converter CMD 1200 - that actually worked. I had my brother in the US purchase one for me and ship it over. I connected the output of my DTH settop box to the input of the CMD 1200 PAL-NTSC converter and connected the output video of the CMD 1200 PAL-NTSC converter to my TV - and viola - wonderful picture with very good clarity and no black bars anywhere.
You can find more about the PAL-NTSC issues in this post here.
Hope this was helpful - happy viewing!
Resources:
Sunday, September 16, 2007
Saturday, August 25, 2007
How to install XBox Media Center on your XBox
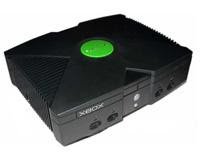
I had an old XBox console lying around which wasn't being used a lot. I had heard a lot about the XBox Media Center and decided to install it and give it a spin. So I trawled the Internet and found everything I could about the subject and finally got it installed on my old XBox - and boy was I blown away! I have to say it is easily the best media center software I have ever laid my eyes on. Here's a quick primer on what you need and how to install the XBox Media Center.
What you need
What is a modded console?
The XBox console by default comes with a variety of software and hardware security mechanisms that prevents it from being used for anything other than its original purpose. However, due to its immense popularity a variety of ways were invented to circumvent its software and hardware security features - this is called modding. There are broadly two forms of modding possible - a software mod and a hardware mod.
Step 1: Download a good FTP client software
Smart FTP is an excellent FTP client for this purpose. I would highly recommend you download and install it prior to starting the installation. It has excellent recursive directory unload/download capabilities with excellent user interface making it the best tool for this purpose.
Step 1: Network your XBox console to your computer
The first step to installing XBox Media Center is to establish a connection between your XBox and your computer. Connect the Ethernet port of your XBox to your network switch/router or directly to your computer via a cross-over cable. Make sure you are able to see your XBox from your computer. You can either assign a static IP to the XBox or a dynamic IP depending on your network settings. To verify that your XBox and your computer can see each other, try FTP'ing into your XBox. Use the IP address of the XBox to connect via your FTP client software such as Smart FTP - use the default port 21 and the following username (xbox) and password (xbox). In case you are unable to determine the IP address of your XBox or are not familiar with FTP, then do not despair - you can still setup XBox Media Center - read on.
Step 3: Backup
The most important step before we do anything is to backup everything on your XBox to your computer before we attempt to install XBox Media Center so that you can restore everything back to its original state if something goes wrong. In order to perform a backup, you MUST have the FTP connection to your XBox as described in Step 2 above. You can skip this step and proceed to Step 4 at your own risk if you do not know how to setup FTP or use the software.
Step 4: Power Backup
It might be a good idea to plug in your XBox console to a UPS to avoid a power failure during the installation. A power failure during installation will not severely damage your XBox but this is a precaution worth taking.
Step 5: Download Slayer's Auto Installer
Slayer's Auto Installer is an excellent piece of software that will enable you to very easily install XBox Media Center (along with a lot of other software) on your XBox. You can find the software here. Download the installer ISO file to your computer.
Step 6: Burn Slayer's Auto Installer to a brand new CD-RW
I cannot emphasize this enough - don't skimp on this step by using a used CD-RW. Make sure to go and buy a brand new CD-RW (Moser Bear worked for me) on which to burn the ISO image of Slayer's Auto Installer. The reason for this is that the XBox DVD Drives have lasers of very low intensity and are very picky when it comes to reading discs. Use Nero or any DVD Burner software to burn it on the CD-RW disc. Ideally burn it as a very slow speed (4x) rather than at high speeds (16x-20x) for better chances of success. Slayer's Auto Installer will come with an older version of XBox Media Center - which is what we will install to start with. But do not worry, you will not be stuck with this old version, we will also discus how to upgrade it to the latest version - but that's getting ahead of ourselves now aren't we :)
Step 6: Run Slayer's Auto Installer on your XBox
The next step is to pop the newly burned disc with Slayer's Auto Installer into your XBox and reboot. If everything goes will you will see the Slayer's Dashboard instead of the default dashboard that you used to see earlier. If for any reason, you do not see Slayer's Dashboard after rebooting, make sure you have correctly burned the ISO image on the CD-RW. Also try with different brands of CD-RW till you find one that works (Moser Bear worked for me). This was the part where I got stuck a bit because I thought it would be OK to use an old CD-RW and it failed - it worked when I finally used a brand new CD-RW disc.
Step 7: Installing Slayer's Dashboard on your XBox
If you have come this far, then this next step will change your life forever :). Navigate through the Slayer's Auto Installer software menu and first backup your HDD Key/EEPROM/BIOS. By default it will be stored in the C:\Backup directory of your XBox. Use the FTP software to get this backup on your computer als0 (you may need the backed up HDD Key/EEPROM/BIOS to recover later). Now select the installer option 3 - New Install/Full Rebuild. Here I am assuming that you have a retail XBox with the standard hard disk. If you plan to install a new larger hard disk in your XBox - this is the time to do it. All you need to do is drop in the new hard disk and the software will do everything else for you. Once you select Menu 3, you will have further options:
Step 8: Experience the magic
Now is the time to sit back and enjoy the fruits of your hard labor. Now remove the Slayer's disc from your XBox and reboot. This is the moment of truth. If the installation was successful, you will now boot directly into Slayer's Dashboard after you turn on your XBox. If this happens, then everything worked. The default dashboard displays a lot of useful information such as your IP address. Now select the Applications menu and from there the XBox Media Center menu to run XBox Media Center. This will launch the XBox Media Center software and you will now see the home screen of the XBox Media Center. This of course is an old build of XBox Media Center bundled with Slayer's Auto Installer. You can upgrade this to the latest T3CH SVN build of XBox at any time as described below.
Step 9: Upgrading your XBox Media Center Software
The mechanism by which we will setup and install XBox Media Center on your XBox is via FTP. Once you have performed all the steps above, you can upgrade the old version of XBox Media Center that came pre-installed with Slayer's Auto Installer by following the steps below:
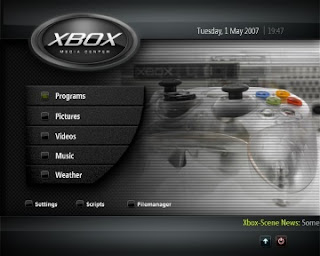
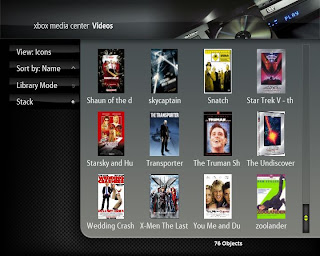
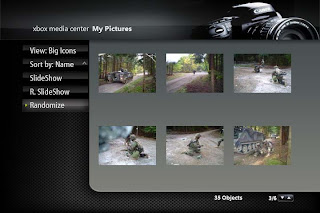
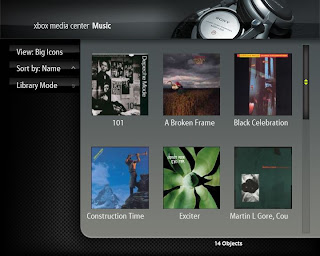
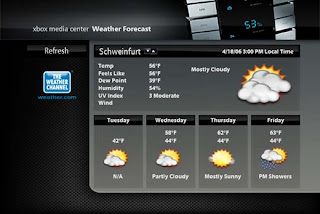
Here are some screen shots to give you an idea of the capabilities.
Start Screen
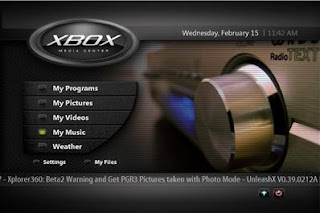
My Videos
My Pictures
My Music
On Screen Display
My Weather
Music Visualizations

Resources:

What you need
- A hardware modded original XBox console (not XBox 360)
- A CD/DVD Burner
- Slayer's Auto Installer Software
- XBox Media Center Software
- A home computer network with your XBox connected along with your computer

What is a modded console?
The XBox console by default comes with a variety of software and hardware security mechanisms that prevents it from being used for anything other than its original purpose. However, due to its immense popularity a variety of ways were invented to circumvent its software and hardware security features - this is called modding. There are broadly two forms of modding possible - a software mod and a hardware mod.
- Soft Mod: The software mod or a soft-mod is usually exploited by a known flaw in the XBox software or game. This usually results in the loading of a hacked BIOS into memory which then allows you to override the default security mechanisms. This does not require any physical modification of the XBox - however it is usually not the most reliable form of modding.
- Hardware Mod/Mod Chip: A hardware mod is usually achieved by physically soldering a hardware chip on to the XBox motherboard which installs a BIOS that overrides the default XBox BIOS thus taking control of the XBox console and removing all factory security mechanisms. This is the recommended way to mod your XBox for use with third party software like XBox Media Center - but please remember that you void your warranty by doing a hardware mod.
Step 1: Download a good FTP client software
Smart FTP is an excellent FTP client for this purpose. I would highly recommend you download and install it prior to starting the installation. It has excellent recursive directory unload/download capabilities with excellent user interface making it the best tool for this purpose.
Step 1: Network your XBox console to your computer
The first step to installing XBox Media Center is to establish a connection between your XBox and your computer. Connect the Ethernet port of your XBox to your network switch/router or directly to your computer via a cross-over cable. Make sure you are able to see your XBox from your computer. You can either assign a static IP to the XBox or a dynamic IP depending on your network settings. To verify that your XBox and your computer can see each other, try FTP'ing into your XBox. Use the IP address of the XBox to connect via your FTP client software such as Smart FTP - use the default port 21 and the following username (xbox) and password (xbox). In case you are unable to determine the IP address of your XBox or are not familiar with FTP, then do not despair - you can still setup XBox Media Center - read on.
Step 3: Backup
The most important step before we do anything is to backup everything on your XBox to your computer before we attempt to install XBox Media Center so that you can restore everything back to its original state if something goes wrong. In order to perform a backup, you MUST have the FTP connection to your XBox as described in Step 2 above. You can skip this step and proceed to Step 4 at your own risk if you do not know how to setup FTP or use the software.
Step 4: Power Backup
It might be a good idea to plug in your XBox console to a UPS to avoid a power failure during the installation. A power failure during installation will not severely damage your XBox but this is a precaution worth taking.
Step 5: Download Slayer's Auto Installer
Slayer's Auto Installer is an excellent piece of software that will enable you to very easily install XBox Media Center (along with a lot of other software) on your XBox. You can find the software here. Download the installer ISO file to your computer.
Step 6: Burn Slayer's Auto Installer to a brand new CD-RW
I cannot emphasize this enough - don't skimp on this step by using a used CD-RW. Make sure to go and buy a brand new CD-RW (Moser Bear worked for me) on which to burn the ISO image of Slayer's Auto Installer. The reason for this is that the XBox DVD Drives have lasers of very low intensity and are very picky when it comes to reading discs. Use Nero or any DVD Burner software to burn it on the CD-RW disc. Ideally burn it as a very slow speed (4x) rather than at high speeds (16x-20x) for better chances of success. Slayer's Auto Installer will come with an older version of XBox Media Center - which is what we will install to start with. But do not worry, you will not be stuck with this old version, we will also discus how to upgrade it to the latest version - but that's getting ahead of ourselves now aren't we :)
Step 6: Run Slayer's Auto Installer on your XBox
The next step is to pop the newly burned disc with Slayer's Auto Installer into your XBox and reboot. If everything goes will you will see the Slayer's Dashboard instead of the default dashboard that you used to see earlier. If for any reason, you do not see Slayer's Dashboard after rebooting, make sure you have correctly burned the ISO image on the CD-RW. Also try with different brands of CD-RW till you find one that works (Moser Bear worked for me). This was the part where I got stuck a bit because I thought it would be OK to use an old CD-RW and it failed - it worked when I finally used a brand new CD-RW disc.
Step 7: Installing Slayer's Dashboard on your XBox
If you have come this far, then this next step will change your life forever :). Navigate through the Slayer's Auto Installer software menu and first backup your HDD Key/EEPROM/BIOS. By default it will be stored in the C:\Backup directory of your XBox. Use the FTP software to get this backup on your computer als0 (you may need the backed up HDD Key/EEPROM/BIOS to recover later). Now select the installer option 3 - New Install/Full Rebuild. Here I am assuming that you have a retail XBox with the standard hard disk. If you plan to install a new larger hard disk in your XBox - this is the time to do it. All you need to do is drop in the new hard disk and the software will do everything else for you. Once you select Menu 3, you will have further options:
- 3 a) New Install/Full Rebuild - Upgraded HDD
- 3 a1) Full Install/Rebuild Large HDD - *C* 5960
- 3 b) New Install/Full Rebuild - Retail HDD
- 3 b1) Full Install/Rebuild Retail HDD - 4920
- 3 b2) Restore Retail Xbox HDD to Factory
- Format your XBox hard drive
- Install Microsoft Live Dash 5960, Evox Dash, XBox Media Center and the rest of the software on the installer disc.
- All applications will be installed in E drive as the F drive may not be available on all retail versions of the XBox.
- The applications will all be pre-configured to work with each other after the install is done.
Step 8: Experience the magic
Now is the time to sit back and enjoy the fruits of your hard labor. Now remove the Slayer's disc from your XBox and reboot. This is the moment of truth. If the installation was successful, you will now boot directly into Slayer's Dashboard after you turn on your XBox. If this happens, then everything worked. The default dashboard displays a lot of useful information such as your IP address. Now select the Applications menu and from there the XBox Media Center menu to run XBox Media Center. This will launch the XBox Media Center software and you will now see the home screen of the XBox Media Center. This of course is an old build of XBox Media Center bundled with Slayer's Auto Installer. You can upgrade this to the latest T3CH SVN build of XBox at any time as described below.
Step 9: Upgrading your XBox Media Center Software
The mechanism by which we will setup and install XBox Media Center on your XBox is via FTP. Once you have performed all the steps above, you can upgrade the old version of XBox Media Center that came pre-installed with Slayer's Auto Installer by following the steps below:
- First find and download the latest T3CH XBox Media Center build - Google T3CH XMBC or try this link.
- The XBox Media Center build is usually a ZIP or RAR file that you need to unzip into a folder on your home computer
- Now start your XBox and go to the default Slayer's dashboard (do not launch XBox Media Center)
- With the XBox turned on, now use the FTP client and establish an FTP connection between your XBox and your computer.
- Log into the XBox using the FTP client using the following settings:
- IP Address: IP address of XBox as displayed in the dashboard
- Port :21
- Username: xbox
- Password: xbox
- First backup your user data that is in the E:\Apps\XMBC\UserData folder. This will save all your settings and configurations.
- Now use the FTP client software and upload (note upload and not download) the XMBC directory from your home PC to the E:\Apps\XMBC directory on your XBox. This will transfer all files from the XMBC build that you extracted in Step 2 into the E:\Apps\XMBC folder of your XBox.
- Once you transfer all the files to your XBox, now upload the User Data folder you saved in Step 6 into the appropriate folder E:\Apps\XMBC\UserData - this will restore all your original configuration and settings.
- That's it - you are all set. For good measure, reboot your XBox and start the XBox Media Center software from the menu - it will launch the new version if you followed all the steps correctly.
Here are some screen shots to give you an idea of the capabilities.
Start Screen

My Videos

My Pictures

My Music

On Screen Display

My Weather

Music Visualizations

Resources:
Saturday, August 18, 2007
My A/V Receiver Wishlist
Finally got a chance to spend some time thinking about the A/V Receivers that I would like to buy next to upgrade my old Yamaha R-V1103 receiver which I have had for about 10 years now. I must say I felt I got my money's worth with my old receiver but now with the advent of new technology it was time to upgrade.
The main criteria for selecting the receiver was:
1.) Must cost under $1600 (comparative price in India with taxes)
2.) Must have HDMI 1.3 with HDMI switching
3.) Must have 1080p upscaling
4.) Must have Ethernet port
5.) Must have streaming capability from PC's on my home network
6.) Must have iPod Docking
The top 3 receivers on my list based on the features I was looking for are (click on the images below for product details):
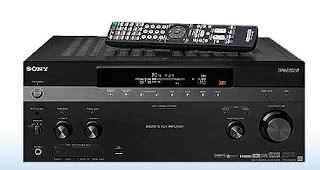
1.) Sony STR-DA5300ES Home Theater A/V Receiver (7.1 channel)
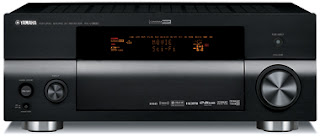
2.) RX-V1800 Home Theater Receiver (7.1 Channel)
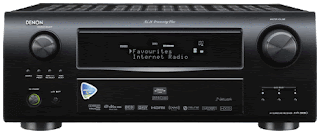
3.) Denon AVR-3808CI (7.1 channel)
I will add to this list as I find other contenders - watch this space.
Resources
The main criteria for selecting the receiver was:
1.) Must cost under $1600 (comparative price in India with taxes)
2.) Must have HDMI 1.3 with HDMI switching
3.) Must have 1080p upscaling
4.) Must have Ethernet port
5.) Must have streaming capability from PC's on my home network
6.) Must have iPod Docking
The top 3 receivers on my list based on the features I was looking for are (click on the images below for product details):
1.) Sony STR-DA5300ES Home Theater A/V Receiver (7.1 channel)
2.) RX-V1800 Home Theater Receiver (7.1 Channel)
3.) Denon AVR-3808CI (7.1 channel)
I will add to this list as I find other contenders - watch this space.
Resources
Sunday, January 07, 2007
High Definition Mania
The last few months I have been really busy downloading and watching high definition content on my TV. Here's some information on where you can get the high definition content, the software you need to view it and how to use various devices to output high definition video to your LCD/Plasma TV.
What is High Definition?
Technically any video encoded at 720p (720 progressive) and above is considered high definition. The standard high definition resolutions are:
Identifying the HD capability of your TV
Getting back to the point, the first step on the road to high definition is to determine what resolutions your TV supports. If your TV is HD ready, then chances are that it will only support 720p and 1080i. If your TV has a sticker on the front which says Full HD 1080p, then in addition to the two resolutions just mentioned, it will also support the full HD resolution of 1080p. If in doubt, check your TV Manual.
Enabling the appropriate HD resolution
The next step is enabling your TV to display in the HD resolution of your choice (assuming your TV supports that resolution). There are three main aspects here:
1.) The high definition video cables
2.) The high definition video source
3.) The high definition video content
Let us look at each of these in turn.
1.) High Definition Video Cables: First off you need to figure out what is the right kind of cable for your TV. This depends on the output connectors on your TV. Let us look at some of the common connectors in the order of highest resolution to the lowest:
(a) HDMI: This connector looks like this [picture]. HDMI stands for high definition multi-media interface. This is the highest quality digital connector to date providing uncompressed, all-digital audio/video interface. The HDMI 1.3 specification is the latest revision and supports output of Dolby TrueHD and DTS-HD Master Audio streams which can then be decoded by external AV receivers. HDMI can also support all the HD video resolutions mentioned above provided your TV supports it. A good quality HDMI cable will cost anywhere between Rs. 1,500 and 3,000.
(b) PC Input/VGA Connector/HD15 PC Input: This connector looks like this [picture]. The VGA connector is very similar in function to the HDMI connector with one important difference, the VGA connector has support only for digital video not digital audio. The audio part of the signal has to be handled separately. VGA supports all the HD resolutions mentioned above. If you had to choose between HDMI and VGA which one would you choose? That depends. The research I have done so far indicates that VGA can sometimes yield an poor image with washed out colors. I have not seen any such problems reported about the HDMI connector. Your results may vary, so the best bet would be to try this out for yourself and pick the connector that works for you. The PC Input connector is typically used to connect your computer to the TV - and yields amazing results compared to an conventional CRT TV. The picture is crisp, stable and flicker free - just like it is on the LCD panel of your laptop.
(c) Component: This connector looks like this [picture]. The component cable is also capable of transferring an analog video signal between your video source and your TV. The component cable has red, green and blue terminals and is a pure video connector - it does not transfer any audio signal. Component cables can do both progressive and interlaced video - and the maximum resolutions supported depends on the TV.
(d) S-Video: This connector looks like this [picture]. This is a very old technology that is on its way out. I would not recommend investing in S-Video cables or worrying about this connector. This is not a high definition video connector. Leave it alone.
(e) Composite: This connector looks like this [picture]. This was probably the most commonly used analog video connector used up to this point. Chances are your old TV was connected to your video source using the component cable. This connector supports analog audio and video. The cable has three terminals: a red and white terminal for stereo audio and a yellow terminal for the analog video signal. This is not a high definition video connector. This is possibly the worst quality audio and video - once again leave it alone.
High Definition Video Source
The video source is the driver that sends the video signal to your TV and determines the resolution that it will display it at. The video source you have must be capable of high definition resolution support. You can find out the resolutions that it supports in the user manual. I will list out some common video sources that are capable of high resolution video output.
(a) DVD Player: It is fairly common to find bugget DVD players in the market today that have an HDMI output and can display video at resolutions of 720p and 1080i. You can pick these up for between Rs. 8,000 and Rs. 12,000. There are also players that can do full HD at 1080p, but there are fairly expensive. Some examples of DVD players worth considering are the Samsung DVD-HD860 for Rs. 8,000 or the Pioneer DV-490V for around Rs. 12,000.
(b) Gaming Console: The Xbox 360 and the Sony Playstation 3 are gaming consoles that are capable of playing video at all the HD resolutions from 720p, 1080i and 1080p. The original XBox is also capable of doing video at high definition resolutions of upto 720p. It can theoritically also do 1080p, but the processor in the original Xbox is not capable of outputting frames at the rate that is required for smooth viewing. So resolutions above 720p can get very jittery and choppy.
(c) Digital Media Server: You can find a lot of media servers in the market today that are capable of playing high definition video. These are currently not easily available in India - so you will need to scrounge around for these abroad and check with friends.
(d) Home Theatre/Media PC: Today's home theatre and media PC's have the horsepower to output digital audio and video. Depending on the processor and video card and the onboard memory of your video card (and to some extent the RAM of your computer), you will be able to do video outputs at all the high definition resolutions using your home theare/media PC.
(e) Apple TV - The recently released Apple TV is really nothing but a high definition media server - but Apple being Apple - I just have to mention it separately. This neat little device is capable of either streaming digital content over the network or synching the digital content to its onboard 40 GB hard disk for playback. At the moment of writing, Apple TV only support resolutions of 720p. Using Apple TV, you can download video content, sync it wirelessly from you PC or Mac to the Apple TV box and then play it on your wide-screen TV.
(f) Digital Audio Video Receivers: The AV receiver is not a video source per se - but provides HDMI switching which is a very useful capability if you have multiple high definition video sources. The HDMI switching capability allows you to leverage the digital audio and video output capability of multiple HDMI connections and switch between them as needed. What happens here is that the receiver processes the digital audio output from the HDMI connection and amplifies it and drives your home theatre speakers and sends the digital video signal untouched to the HDMI out terminals on the back of the AV receiver - from where you connect it back to your TV. This way, you can take advantage of both the digital video and audio capabilities of your HDMI connection. Some receivers also have multiple HDMI connectors in the back panel and this allows you to connect multiple HDMI sources - this is a real blessing specially if your TV only has a single HDMI connection. If you haven't purchased an HD Ready or Full HD TV yet, I would recommend buying one with multiple HDMI inputs - if you are a audio/videophile like me where the chances of owning multiple high definition sources are quite high.
(g) Blu Ray and HD-DVD Players: You can view HD content using either a HD-DVD player or a Blu Ray player - however at the time of writing, only the PS3 with its built in Blu Ray drive is available in India. There are rumors of XBox shipping its HD-DVD drive, but when it will actually debut is anyones guess. Both these devices are designed to play high definition content in the highest possible resolutions.
(h) HDTV Tuners: HDTV tuners can pull high definition broadcast signals off the air and pipe it into your TV. This option is not yet available in India and it will be a while before channels here broadcast in high definition.
High Definition Video Content
The entire discussion above is moot if you dont have access to high definition video content. This section focuses on the high definition content available in India and how you can get hold of good HD content. The main sources of HD today are:
1.) Torrents: BitTorrent is a peer to peer technology for file sharing and you can get started quickly by installing a BitTorrent client like µTorrent, Azureus, BitTorrent, BitComet or KTorrent. You can find a bunch of really good HD stuff on the torrent sites. Seach for 720p, HD, 1080i and 1080p as search key words to find the right content. You can really find some amazing content on the torrent portals such as TorrentSpy. The BBC Planet Earth in high definition is highly recommended as is the Microcosm. These video clips will render in high definition glory on your TV and is a great way to showcase the high definition capability of your TV.
2.) HD DVD Discs: These are not yet officially available in India - but if you have access to friends abroad and also have a HD DVD player, then this is an excellent source of high definition content.
3.) Blu Ray Discs: Bly Ray is the competing format to HD-DVD - and the main difference between the two is the total maximum storage available on these formats - with Blu Ray leading the race at the moment with upto 50GB disks and HD-DVD coming in at around 30 GB. Once again, Blu Ray is not available in India - but with the release of the PS3, I am sure its just a matter of time before some Blu Ray titles will be available in India.
4.) Video games: You can also get high definition content on your video games - both Xbox 360 and the PS3 are capable of rendering games at high definition resolutions. You can control the actual resolution from the settings/options panel of your gaming console.
Putting it all together
Once you have a clear understanding of the video connectors provided on your TV and the capability of your video source to output digital video and where you can get high definition content - you can now put it all together and enjoy high definition video on your TV. You basically need to connect your video source to your TV using the appropriate high definition connector of your choice. The next step is to either stream high definition content over your network to your video player or burn a DVD disk play it in your video player. You can control the high definition resolution of the final video image from your video player - you will find this in the options or settings menu of your player.
This article is getting pretty long - so I will cut it short here. I will cover how to set up a home network for digital streaming in my next post. Let me know if you have any questions - I will be happy to answer them. Happy viewing!
Resources
What is High Definition?
Technically any video encoded at 720p (720 progressive) and above is considered high definition. The standard high definition resolutions are:
- 1280 x 720 progressive (720p)
- 1920 x 1080 interlaced (1080i)
- 1920 x 1080 progressive (1080p)
Identifying the HD capability of your TV
Getting back to the point, the first step on the road to high definition is to determine what resolutions your TV supports. If your TV is HD ready, then chances are that it will only support 720p and 1080i. If your TV has a sticker on the front which says Full HD 1080p, then in addition to the two resolutions just mentioned, it will also support the full HD resolution of 1080p. If in doubt, check your TV Manual.
Enabling the appropriate HD resolution
The next step is enabling your TV to display in the HD resolution of your choice (assuming your TV supports that resolution). There are three main aspects here:
1.) The high definition video cables
2.) The high definition video source
3.) The high definition video content
Let us look at each of these in turn.
1.) High Definition Video Cables: First off you need to figure out what is the right kind of cable for your TV. This depends on the output connectors on your TV. Let us look at some of the common connectors in the order of highest resolution to the lowest:
(a) HDMI: This connector looks like this [picture]. HDMI stands for high definition multi-media interface. This is the highest quality digital connector to date providing uncompressed, all-digital audio/video interface. The HDMI 1.3 specification is the latest revision and supports output of Dolby TrueHD and DTS-HD Master Audio streams which can then be decoded by external AV receivers. HDMI can also support all the HD video resolutions mentioned above provided your TV supports it. A good quality HDMI cable will cost anywhere between Rs. 1,500 and 3,000.
(b) PC Input/VGA Connector/HD15 PC Input: This connector looks like this [picture]. The VGA connector is very similar in function to the HDMI connector with one important difference, the VGA connector has support only for digital video not digital audio. The audio part of the signal has to be handled separately. VGA supports all the HD resolutions mentioned above. If you had to choose between HDMI and VGA which one would you choose? That depends. The research I have done so far indicates that VGA can sometimes yield an poor image with washed out colors. I have not seen any such problems reported about the HDMI connector. Your results may vary, so the best bet would be to try this out for yourself and pick the connector that works for you. The PC Input connector is typically used to connect your computer to the TV - and yields amazing results compared to an conventional CRT TV. The picture is crisp, stable and flicker free - just like it is on the LCD panel of your laptop.
(c) Component: This connector looks like this [picture]. The component cable is also capable of transferring an analog video signal between your video source and your TV. The component cable has red, green and blue terminals and is a pure video connector - it does not transfer any audio signal. Component cables can do both progressive and interlaced video - and the maximum resolutions supported depends on the TV.
(d) S-Video: This connector looks like this [picture]. This is a very old technology that is on its way out. I would not recommend investing in S-Video cables or worrying about this connector. This is not a high definition video connector. Leave it alone.
(e) Composite: This connector looks like this [picture]. This was probably the most commonly used analog video connector used up to this point. Chances are your old TV was connected to your video source using the component cable. This connector supports analog audio and video. The cable has three terminals: a red and white terminal for stereo audio and a yellow terminal for the analog video signal. This is not a high definition video connector. This is possibly the worst quality audio and video - once again leave it alone.
High Definition Video Source
The video source is the driver that sends the video signal to your TV and determines the resolution that it will display it at. The video source you have must be capable of high definition resolution support. You can find out the resolutions that it supports in the user manual. I will list out some common video sources that are capable of high resolution video output.
(a) DVD Player: It is fairly common to find bugget DVD players in the market today that have an HDMI output and can display video at resolutions of 720p and 1080i. You can pick these up for between Rs. 8,000 and Rs. 12,000. There are also players that can do full HD at 1080p, but there are fairly expensive. Some examples of DVD players worth considering are the Samsung DVD-HD860 for Rs. 8,000 or the Pioneer DV-490V for around Rs. 12,000.
(b) Gaming Console: The Xbox 360 and the Sony Playstation 3 are gaming consoles that are capable of playing video at all the HD resolutions from 720p, 1080i and 1080p. The original XBox is also capable of doing video at high definition resolutions of upto 720p. It can theoritically also do 1080p, but the processor in the original Xbox is not capable of outputting frames at the rate that is required for smooth viewing. So resolutions above 720p can get very jittery and choppy.
(c) Digital Media Server: You can find a lot of media servers in the market today that are capable of playing high definition video. These are currently not easily available in India - so you will need to scrounge around for these abroad and check with friends.
(d) Home Theatre/Media PC: Today's home theatre and media PC's have the horsepower to output digital audio and video. Depending on the processor and video card and the onboard memory of your video card (and to some extent the RAM of your computer), you will be able to do video outputs at all the high definition resolutions using your home theare/media PC.
(e) Apple TV - The recently released Apple TV is really nothing but a high definition media server - but Apple being Apple - I just have to mention it separately. This neat little device is capable of either streaming digital content over the network or synching the digital content to its onboard 40 GB hard disk for playback. At the moment of writing, Apple TV only support resolutions of 720p. Using Apple TV, you can download video content, sync it wirelessly from you PC or Mac to the Apple TV box and then play it on your wide-screen TV.
(f) Digital Audio Video Receivers: The AV receiver is not a video source per se - but provides HDMI switching which is a very useful capability if you have multiple high definition video sources. The HDMI switching capability allows you to leverage the digital audio and video output capability of multiple HDMI connections and switch between them as needed. What happens here is that the receiver processes the digital audio output from the HDMI connection and amplifies it and drives your home theatre speakers and sends the digital video signal untouched to the HDMI out terminals on the back of the AV receiver - from where you connect it back to your TV. This way, you can take advantage of both the digital video and audio capabilities of your HDMI connection. Some receivers also have multiple HDMI connectors in the back panel and this allows you to connect multiple HDMI sources - this is a real blessing specially if your TV only has a single HDMI connection. If you haven't purchased an HD Ready or Full HD TV yet, I would recommend buying one with multiple HDMI inputs - if you are a audio/videophile like me where the chances of owning multiple high definition sources are quite high.
(g) Blu Ray and HD-DVD Players: You can view HD content using either a HD-DVD player or a Blu Ray player - however at the time of writing, only the PS3 with its built in Blu Ray drive is available in India. There are rumors of XBox shipping its HD-DVD drive, but when it will actually debut is anyones guess. Both these devices are designed to play high definition content in the highest possible resolutions.
(h) HDTV Tuners: HDTV tuners can pull high definition broadcast signals off the air and pipe it into your TV. This option is not yet available in India and it will be a while before channels here broadcast in high definition.
High Definition Video Content
The entire discussion above is moot if you dont have access to high definition video content. This section focuses on the high definition content available in India and how you can get hold of good HD content. The main sources of HD today are:
1.) Torrents: BitTorrent is a peer to peer technology for file sharing and you can get started quickly by installing a BitTorrent client like µTorrent, Azureus, BitTorrent, BitComet or KTorrent. You can find a bunch of really good HD stuff on the torrent sites. Seach for 720p, HD, 1080i and 1080p as search key words to find the right content. You can really find some amazing content on the torrent portals such as TorrentSpy. The BBC Planet Earth in high definition is highly recommended as is the Microcosm. These video clips will render in high definition glory on your TV and is a great way to showcase the high definition capability of your TV.
2.) HD DVD Discs: These are not yet officially available in India - but if you have access to friends abroad and also have a HD DVD player, then this is an excellent source of high definition content.
3.) Blu Ray Discs: Bly Ray is the competing format to HD-DVD - and the main difference between the two is the total maximum storage available on these formats - with Blu Ray leading the race at the moment with upto 50GB disks and HD-DVD coming in at around 30 GB. Once again, Blu Ray is not available in India - but with the release of the PS3, I am sure its just a matter of time before some Blu Ray titles will be available in India.
4.) Video games: You can also get high definition content on your video games - both Xbox 360 and the PS3 are capable of rendering games at high definition resolutions. You can control the actual resolution from the settings/options panel of your gaming console.
Putting it all together
Once you have a clear understanding of the video connectors provided on your TV and the capability of your video source to output digital video and where you can get high definition content - you can now put it all together and enjoy high definition video on your TV. You basically need to connect your video source to your TV using the appropriate high definition connector of your choice. The next step is to either stream high definition content over your network to your video player or burn a DVD disk play it in your video player. You can control the high definition resolution of the final video image from your video player - you will find this in the options or settings menu of your player.
This article is getting pretty long - so I will cut it short here. I will cover how to set up a home network for digital streaming in my next post. Let me know if you have any questions - I will be happy to answer them. Happy viewing!
Resources
Subscribe to:
Comments (Atom)